
You guessed it!!
I made super fun and patriotic marshmallow cupcake toppers for this 4th of July using KRAFT Jet-Puffed Marshmallows.
I think out of all the cupcake topper tutorials I’ve done this year, these are the easiest to make!

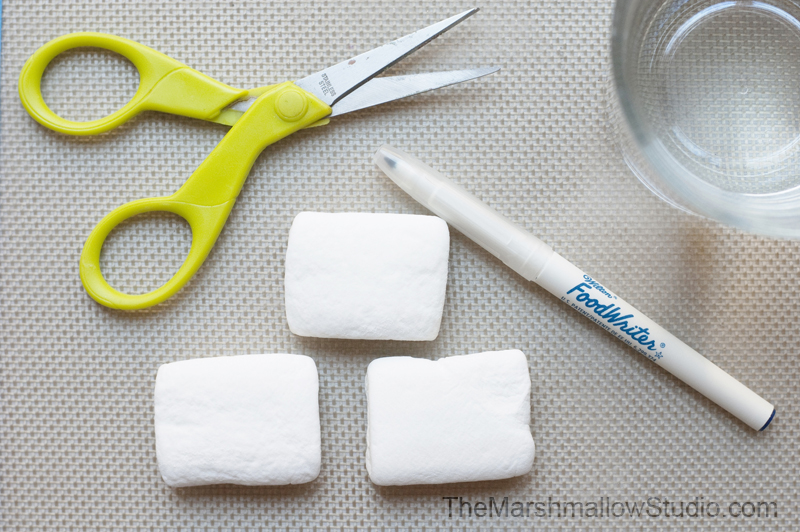
Here are all the goodies and tools I used to make these six different designs.

No doubt that it helps to plan ahead. A few weeks ago I baked red velvet cupcakes. I knew I would need 6 for this tutorial so I set some batter aside.
I filled my fabulous Sweets & Treats Boutique cupcake liners and baked as usual. After baking, I let them cool completely on the countertop. When they were cool, I placed them in a freezer grade zip-top bag and popped them in the freezer. As you can see, they look freshly baked. The wrappers are still bright and pretty too. BTW, they tasted freshly baked too!!
I can always count on these amazing grease-proof cupcake liners to look great. They’re my FAVORITE!
***********************************************************************************
Let’s get started with the fun stuff.
SHIMMERY PATRIOTIC STARS

This was my son, Aiden’s favorite design. He patiently waited until I photographed it so he could eat it.
(Side note: photographing glitter is hard LOL they came out out of focus every time.)

GRAB: Red icing, blue icing, white icing, red disco dust, blue disco dust, silver disco dust, 3 Jet-Puffed StarMallows (one of each color), a food decorating brush, food scissors, a paper straw and water.
MAKE: Squeeze a small amount of blue icing onto blue star. Smear all over with brush. Using same brush, dub blue disco dust on top of icing. Set aside. Repeat for white and red star. Cut paper straw into three pieces. Dip straw end into water then immediately, insert it into the side bottom of the star. Repeat for the others.
EMBELLISH: Sprinkle silver stars on cupcake frosting.
TIP: If you can’t find StarMallows, you can use a mini star cookie cutter. Punch out your own marshmallow stars from Jet-Puffed StakerMallows.


Don’t they look sooo pretty?!

:: Let’s talk “edible” glitter really quick ::
Some of you are thinking right now “how fun, I’d totally eat that” and others are thinking “OMG how can she possibly use disco dust when it’s not even edible”.
Here’s the thing – disco dust is NOT EDIBLE. It is clearly labeled on the very expensive tiny tub it comes in. People misunderstand “non-toxic” with “edible”.
I’m one of those people. I know it’s not supposed to be consumed. I also know it’s for decorative purposes only. Yet, I make the choice to eat it anyway. Judge me. Go ahead.
There are many things we consume daily that are probably worse (food colorings, GMOs, non-organic, etc.). I do not believe the miniscule amount of sprinkled “glitter” I use will hurt me or my family in any way.
However… if I was selling these or making them for other’s to consume, I would omit the disco dust because it should be their CHOICE to consume it or not and I don’t want to force them to because it’s already all over the goodies.
There! Now we can move on.
US FLAG

It can’t be 4th of July without US flags everywhere!

GRAB: 1 Jet-Puffed StackerMallows, Wilton extra fine FoodWriter marker in blue and red, food tweezers, white icing and mini star sprinkles.
MAKE: Draw a blue square on the upper left corner of the marshmallow. Draw horizontal red stripes covering the marshmallow. Using tweezers and white icing, attach the white mini star sprinkles on top of the blue square.
EMBELLISH: Sprinkle mini stars on cupcake frosting.
TIP: You can pretty much use this same technique to make any country’s flag. (i.e. Mexican for Cinco de Mayo, Chinese for Chinese new year, Irish for St. Patrick’s Day)


PATRIOTIC FIREWORK

This is a classic case of “it looked better in my mind” design.
My hubz said it looked like an upside down marshmallow skewer. I kinda agree LOL.

GRAB: 3 Jet-Puffed Mini Marshmallows, Wilton FoodWriter marker in black, toothpick, red sugar, blue sugar, gold disco dust and water.
MAKE: Dip one marshmallow into the water. Gently tap dry on a paper towel. Roll in blue sugar. Set aside to dry. Repeat for other marshmallow but roll in red sugar. Let both dry for 3 minutes. Insert tip of the toothpick into water and immediately insert the blue marshmallow. Next, the white marshmallow and finally the red marshmallow. Color the exposed toothpick tip with the black marker. Dip the tip of the toothpick into the gold glitter.
EMBELLISH: Sprinkle gold disco dust on cupcake frosting.
TIP: After eating this cupcake, I remembered I had bought black licorice rope earlier for the firework’s wicker. You can try that when you make yours.


BLUE STAR & RED STRIPES
GRAB: 1 Jet-Puffed StarMallow, blue sugar and water.
MAKE: Dip star marshmallow into the water. Gently tap dry on a paper towel. Roll in the blue sugar. Set aside to dry for 3-5 minutes before handling.
TIP: Instead of filling two different piping bags with two different frostings, you can use the NEW Wilton’s Color Swirl system and pipe two-three colors at once. Awesomeness!


USA!

For birthday parties, you can make number marshmallow toppers in any color!
GRAB: 3 Jet-Puffed StackerMallows, Wilton extra fine FoodWriter marker in blue, blue sugar, water and food scissors.
MAKE: Outline an “U” on a marshmallow. Next do the same for the letters “S” and “A”. Use scissors to cut out the letters along the outline. Dip scissors into the water before and after making cuts. Dip letter marshmallows into the water. Gently tap dry on a paper towel. Roll in the blue sugar. Set aside to dry for 3-5 minutes before handling.
TIP: If you have mini letter cookie cutter that fit in a StackerMallow, you can use those instead of using a marker and scissors.


UNCLE SAM’S TOP HAT
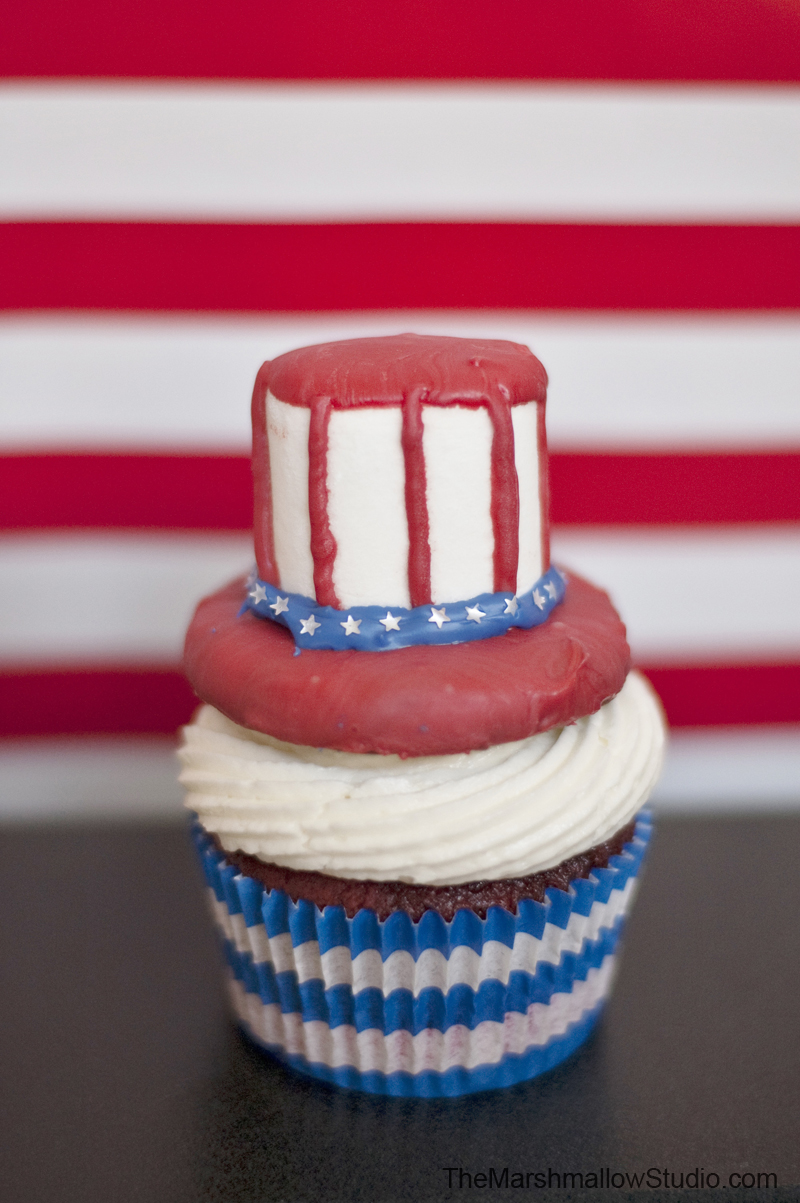
Remember my Leprechaum’s hat topper I made for St. Patrick’s Day?
Here’s the American version.

GRAB: 1 Keebler Fudge Stripes cookie, 1 Jet-Puffed Large Marshmallow, Wilton Red Candy Melts, Wilton Blue Candy Melts, Wilton Silver Edible Glitter Stars, food tweezers and Wilton’s Dipping Scoop.
(NOTE: I photographed a squeeze tube but when I was making these, I noticed it was easier to use piping bags instead.)
MAKE: Melt a handful of red candy melts according to instructions on package. Place cookie on dipping scoop and pour candy melt over it using spoon. Make sure it’s completely covered. Set aside on wax paper or silicone mat. Immediately dip top of large marshmallow in candy melt just enough to cover flat side. It should not cover sides or drip over them. Place marshmallow on top of the hat with the dipped end upward. Pour a couple of spoonfuls of candy melt into a piping bag. Snip tip and pipe vertical stripes down the sides of the marshmallow. Let hat sit aside to set for 15 minutes. When the chocolate as set, melt a few blue candy melts in another piping bag. snip the tip and pipe a “ribbon” along the bottom of the hat. Immediately, attach silver stars using tweezers.


Here are all the toppers ready to make my ordinary Independence Day cupcakes into extraordinarily cute cupcakes!

Check out this fabulous treats stand I received from the Cake Pop Stand Company –

There are so many things I like about it!
First of all, I LOVE that it folds down completely into 7 thin boards.
I love the light PVC plastic material it is made out of. I love that one side has inserts for cupcakes and the other is flat for other treats.

I also really like how active the company is on social media with their followers AND how amazing their customer service is. 🙂
They have several different stands, different colors and really cool custom stuff too. Check them out!

I hope you liked these and give them a try this holiday. Have fun!!

Which design was your favorite?
I love these so much! My absolute favorite is Uncle Sam’s hat though!! Great job!
Thanks so much Shannon. Your cupcake liners make all the difference in the world 😄